In this post, I will provide a step-by-step guide to allow you to create and access an Oracle Integration 3 Instance in Oracle Cloud.
Note 1: Given the regular release schedule present in Oracle Cloud, it is possible that the screens may change somewhat beyond the writing of this post. If this happens, please comment on this post and I will try to help you out. (and update this post!)
Create an Integration Instance
Step 1: Log into your Oracle Cloud account

Step 2: Click on the menu icon (often referred to as “Hamburger” or “Pancake Stack” icon)

Step 3: Select “Developer Services” and then Select “Integration”

Step 4: If you wish to change the compartment in which you are provisioning the Oracle Integration 3 instance, you can do so here before clicking “Create Instance”. Here you can see that I already have 2 instances already provisioned (1x Oracle Integration Gen 2 & 1x Oracle Integration 3). If you have not yet set up a compartment, see my post: Creating a Compartment in Oracle Cloud.

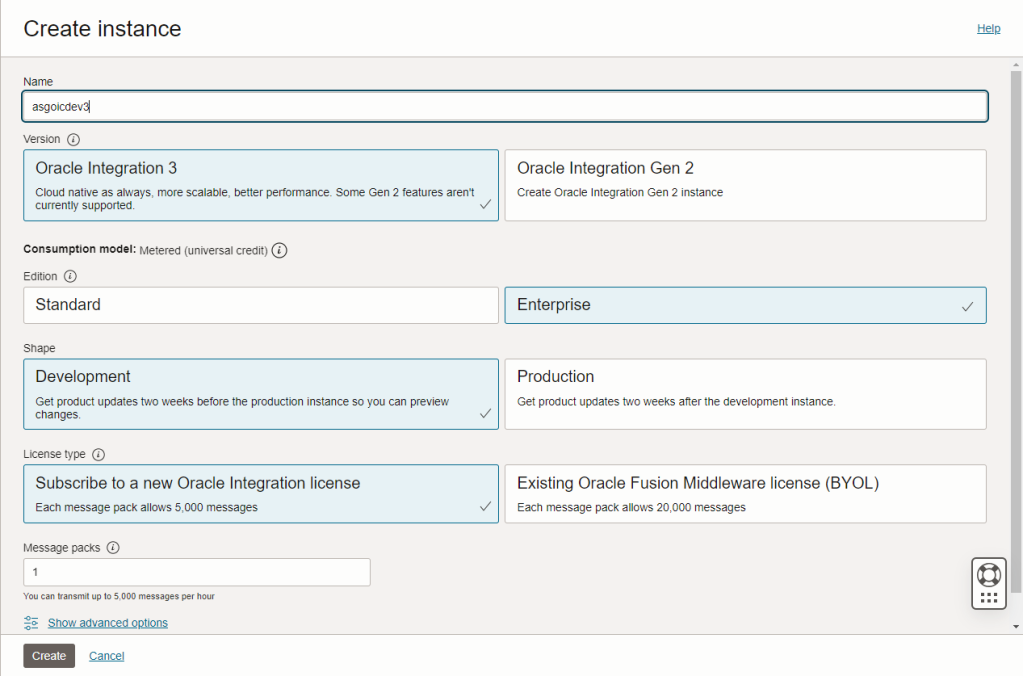
Step 5: Provide information for the integration instance as below:
| Field | Description |
|---|---|
| Name | This is the display name for your Oracle integration 3 instance |
| Version | This is the version of Oracle Integration that you want to provision. Note that at present it is possible to provision an Oracle Integration Gen 2 instance or an Oracle Integration 3 instance. (click here to read about the differences) |
| Edition | This is the Oracle Integration edition (Enterprise or Standard) that contains the features and adapters you need. (click here to read about editions) |
| Shape | This is the definition of the type of instance you are provisioning. (Most likely “Development”) |
| License Type | This is the definition of your type of license you will attach to your integration instance (Most likely “Subscribe to a new Oracle Integration License”) |
| Message Packs | This is the number of messages that you expect your instance to handle. Here you can select the number of message packs that you want. (click here to read more about message packs) |

Step 6: Click “Create”
The instance will now be automatically provisioned by Oracle Cloud. The state is shown as “Creating”

And there we have it! After a short period of time Oracle Cloud has successfully provisioned my new Oracle Integration 3 instance and it is ready to use!

Pingback: November 2023 - New Additions - Implementing Oracle Integration Cloud
Pingback: OCI Integration Fundamentals: Global Fault Handler | AMY SIMPSON-GRANGE – BLOG
Pingback: OCI Integration Fundamentals: Scope Fault Handler | AMY SIMPSON-GRANGE – BLOG